Using uv for Python package management

Traditionally we have recommend that users use a
Python virtualenv
or Conda environment
to manage personal package installations via pip install and mamba install
commands. But a new contender has entered the fray:
uv, an extremely fast Python package and
project manager, written in Rust.
Why uv?
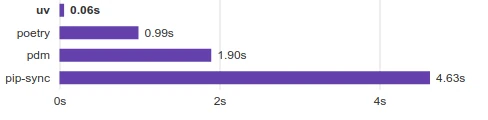
In short, because it is faster. Below is a comparison for installing Trio's dependencies with a warm cache:
As well as being faster, uv combines the features of many other popular
Python tools, uses a global cache
and much more.
uv is still in development
Whilst uv offers a whole host of benefits, it is still yet to reach a
proper v1.0 release. Usage of it on Apocrita is at the user's own risk.
Installing uv
Do not follow the default install instructions
The default installation method
for uv should not be used on Apocrita, as it will automatically install
to ${HOME}/.local/bin and also modify your shell profiles which can
interfere with our
Modules
system for using additional software. Please instead follow the instructions
as detailed below.
Downloading the install script
The default installation method for
uv will download a bash installation script via curl and then pipe it to
bash. Please do not use this method. Instead, manually download the
install.sh script for the latest release using wget:
wget https://astral.sh/uv/install.sh
You should always inspect bash scripts you download from the internet using
tools such as cat before going on to execute them.
Installing uv using install.sh
Once you have inspected the contents of install.sh and are happy with them,
mark the script as executable:
chmod +x install.sh
By default, the installation script will install uv into ${HOME}/.local/bin
and also modify your shell profiles which can interfere with our
Modules
system for using additional software. You shouldn't do this. Instead, first
create a destination directory for the installation, the example below will use
uv in your home directory, but you may use whichever location you wish:
mkdir ${HOME}/uv
Then, execute install.sh prepended with the commands to
change the install path
and
disable shell modifications:
UV_INSTALL_DIR="${HOME}/uv" INSTALLER_NO_MODIFY_PATH=1 ./install.sh
This should output something like:
downloading uv <version> x86_64-unknown-linux-gnu
no checksums to verify
installing to /data/home/<username>/uv
  uv
  uvx
everything's installed!
Creating a private module
Rather than manually export environment variables such as $PATH, we prefer
that users create
Private Modules
for personally installed software. Assuming our uv installation is now in a
directory called uv inside our home directory, a Private Module would look
something like this:
#%Module
#
# uv module file

proc ModulesHelp { } {
    puts stderr "\tAdds uv to your environment"
}

module-whatis "Loads uv"

prepend-path PATH /data/home/<username>/uv
Create this using one of our
recommended text editors
(replace <username> with your actual Apocrita username) and save it as:
/data/home/<username>/privatemodules/uv/latest
We have called it latest there so when you run:
module load use.own uv
It should load and make uv available in your $PATH:
$ ml use.own uv
$ which uv
~/uv/uv
$ uv --version
uv <version>
$ uv -h
An extremely fast Python package manager.

Usage: uv [OPTIONS] <COMMAND>

Commands:
(etc.)
Updating uv
uv is able to
update itself in place,
so rather than downloading and extracting a new tarball for each new release,
you can simply load your private module and run:
uv self update
If an update is available, it will be downloaded and applied:
info: Checking for updates...
success: Upgraded uv from v<old version> to v<new version>!
https://github.com/astral-sh/uv/releases/tag/<new version>
If no updates are available you will see:
info: Checking for updates...
success: You're on the latest version of uv (v<version>)
Using uv
Virtual environments
Load a Python module first!
Whilst uv can
install its own versions of Python,
it's better to load one of our provided
Python modules and
then create your uv virtual environment using it as detailed below.
uv supports creating virtual environments. First load a Python module:
module load python
To load a specific Python module, use its full name, e.g. for Python 3.12:
module load python/3.12.1-gcc-12.2.0
Then, to create a uv virtual environment called "myenv" in the current
working directory, run:
uv venv --no-managed-python myenv
The version of Python used to create the environment will be listed during its creation, e.g.:
Using CPython 3.11.7 interpreter at: /share/apps/rocky9/spack/apps/linux-rocky9-x86_64_v4/gcc-12.2.0/python/3.11.7-rj3pox3/bin/python
Creating virtual environment at: myenv
Activate with: source myenv/bin/activate
Running commands without --no-managed-python means that uv may use its own
internal versions of Python via CPython and PyPy, allowing you to use additional
versions of Python other than those we offer via modules. However, we recommend
users use the module versions where possible, as they have been optimally
compiled for Apocrita. More information about managed and system Python
installations can be found in
the official uv documentation.
Conda environments
Don't manually install or update uv when using Conda
When using Conda, you shouldn't install and/or
update uv manually as previously detailed. You should
manage your uv installation entirely using mamba as detailed below
instead.
uv is packaged in the Conda Forge community Conda
channel:
https://anaconda.org/conda-forge/uv
To create a Conda environment called "myenv" containing uv, load the
Miniforge module and
then run the
mamba create command.
Be sure to specify your Python version and also that you want uv to be
installed into the Conda environment from Conda Forge during the environment's
creation:
module load miniforge
mamba create -n myenv python=3.11 uv
Inspect the list of packages to be installed and confirm with by typing Y and
pressing enter:
Confirm changes: [Y/n] Y

Downloading and Extracting Packages:

Preparing transaction: done
Verifying transaction: done
Executing transaction: done

To activate this environment, use

     $ mamba activate myenv

To deactivate an active environment, use

     $ mamba deactivate
Installing Python packages with uv
uv installs packages from PyPi
Package installs using uv will use PyPi by default.
However, whilst uv is designed as a drop-in replacement for common pip
and pip-tools workflows, it is not intended to be an exact clone of
pip. Please see the
official documentation for
further information.
Once you have an activated uv virtual environment or
Conda environment, you can
install packages using uv.
For example, to install numpy from PyPi:
(myenv) $ uv pip install numpy
Using Python 3.11.7 environment at: myenv
Resolved 1 package in 62ms
Prepared 1 package in 1.07s
Installed 1 package in 203ms
 + numpy==2.2.3
(myenv) $ python
Python 3.11.7 (main, Jun  4 2024, 11:36:35) [GCC 12.2.0] on linux
Type "help", "copyright", "credits" or "license" for more information.
>>> import numpy
>>> numpy.version.version
'2.2.3'
>>>
Notice that speed. For comparison, here is an installation of numpy using the
older virtualenv method:
(myenv) $ time pip install numpy
Looking in indexes: https://pypi.org/simple, https://pypi.ngc.nvidia.com
Collecting numpy
  Downloading numpy-2.2.3-cp311-cp311-manylinux_2_17_x86_64.manylinux2014_x86_64.whl.metadata (62 kB)
Downloading numpy-2.2.3-cp311-cp311-manylinux_2_17_x86_64.manylinux2014_x86_64.whl (16.4 MB)
   ━━━━━━━━━━━━━━━━━━━━━━━━━━━━━━━━━━━━━━━━ 16.4/16.4 MB 127.5 MB/s eta 0:00:00
Installing collected packages: numpy
Successfully installed numpy-2.2.3

real    0m7.747s
user    0m3.544s
sys 0m0.472s
Compare this with uv:
(myenv) $ time uv pip install numpy
Using Python 3.11.7 environment at: myenv
Resolved 1 package in 72ms
Prepared 1 package in 1.24s
Installed 1 package in 189ms
 + numpy==2.2.3

real    0m1.627s
user    0m0.405s
sys 0m0.350s
All caches were cleared before the above runs - uv really is that much faster.
For additional information about package management via uv, please refer to
the official uv documentation.
Cache management
Part of the reason why uv is so fast is because of its caching. Please be
mindful of this though. By default the uv cache is stored in
${HOME}/.cache/uv. You may wish to symlink this location to your
scratch if this gets too large
(keeping in mind that there is an
auto-deletion policy).
More detailed information about the uv cache can be found in the
official uv documentation.
Conclusion
This tutorial serves as a basic guide to uv. More detailed information can
be found in the official uv documentation. If you
have any questions regarding the use of uv, please contact us on our
Slack channel (QMUL users only), or
by sending an email to
its-research-support@qmul.ac.uk which
is handled directly by staff with relevant expertise.
References
Title image: Taken from the Astral Blog