SSH authentication and accessing Apocrita

In response to a coordinated security attack on HPC sites world-wide back in 2020, it was necessary to implement some changes to enforce a higher level of authentication security. In this article, we begin with providing some useful information to understand key-based authentication, and document the process for accessing the cluster.
SSH authentication methods
1) Password authentication
Using password authentication, a user may connect to a server by providing a username and a login password. Since password authentication alone allows anyone who obtains the password (via brute force, snooping or phishing) access, another level of security is considered best-practice.
2) Private/public SSH key-based authentication
To use key-based authentication, the user creates an SSH key pair consisting of a public and private key. The private key will decrypt anything that is encrypted by the public key, therefore it must always be stored securely, not shared with anyone, nor uploaded to any remote server (e.g. Apocrita).
To authenticate with a server, the public key is stored in a special file
within the user's .ssh directory under the user's home directory, called
authorized_keys. A valid key in this file allows the owner of the
private part of the key to authenticate. If you do not have access to
Apocrita with an existing key, the server system administrator will need to do
this for you.

Protecting the private key
Since anyone in possession of the private key can authenticate as the user who has set up key-based authentication, the private key itself must be encrypted (automatically applied on key pair creation) and protected with a passphrase. This way, a stolen private key cannot be re-used without knowing the password to decrypt it. To avoid typing the passphrase each time you use a key, add the private key to an ssh-agent. Any keys managed by the SSH agent do not require unlocking each time they are used.
In the same way that passwords should not be re-used on different services, a new key pair should be used for each different service you use. Multiple keys can be added to the SSH agent.
Private keys should remain on your workstation, rather than stored on the servers.
3) Multi-factor authentication with passwords & keys
Authentication is more secure when you combine something you know (a password) with something you have (i.e. a private key). In response to a coordinated cyber-attack which affected many HPC systems around the world in 2020, we now require both your login password and a valid key pair to connect to Apocrita.
Accessing the Apocrita HPC Cluster
Required steps:
- create a new private/public key pair (ED25519 preferred)
- upload a new public key using this form
- Wait for an email from us confirming that your public SSH key has been successfully added to your Apocrita account
After these steps, it will be possible to login using your new key and password.
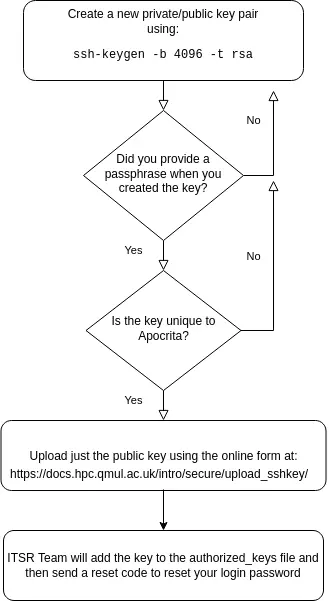
1. Creating a new SSH key pair
Creating an SSH key pair requires typing commands into a terminal window on your PC, and follows a similar process on all Operating Systems.
If you only require one key, you can accept the default name of id_ed25519.
However, if you login to other services with key-based authentication, such as
other HPC clusters, or GitHub, then you may want to name your key to make it
easier to identify.
Key creation example using a default key name
If you already have a key called id_ed25519 or want to give your key a more
descriptive name:
Key creation example using custom key name
Using an SSH agent
Since a passphrase-protected private key is stored on disk in encrypted form, the passphrase is required each time a key is used to login. However, an SSH agent stores a list of keys in memory in their decrypted form, allowing them to be used by the ssh client program without requiring the passphrase every time.
Using an SSH agent makes key-based authentication a more seamless process.
The following example shows:
- how to verify the SSH agent is running
- list any existing private keys managed by the SSH agent
- add a private key named
id_ed25519_apocritafrom the.sshdirectory - confirm that the private key has been added to the agent
Adding a named key to the SSH agent
Making things easier with an SSH config file
Since you should be using different keys to connect to distinct services, the
combination of hostnames, usernames and key files can get a bit too much to
remember. Fortunately the SSH config file allows you to save presets. For
example, create a file called config in the ~/.ssh directory (~ is a
shortcut for your home directory) similar to this:
Host apocrita
  HostName login.hpc.qmul.ac.uk
  User abc123
  IdentityFile ~/.ssh/id_ed25519_apocrita
  ForwardAgent yes
With this new preset, ssh apocrita performs the equivalent of ssh -A -i
~/.ssh/id_ed25519_apocrita abc123@login.hpc.qmul.ac.uk. You can add as many other
host definitions as you require, plus other settings to tweak the behaviour of
the SSH program.
2. Uploading your public key
Once you have created your key pair, and uploaded the public part via this form, the ITS Research team will process your request and place the public key in the appropriate file.
Logging into Apocrita
After following these steps, you will be able to login to the cluster.
If you have set up an SSH config file as shown above, and added your key to the SSH agent, your login experience will look similar to this:
user@pc:~$ ssh apocrita
Authenticated with partial success.
abc123@login.hpc.qmul.ac.uk's password: <enter login password>
--------------------------------------------------------------------------------
|                                                                              |
|                              Welcome to Apocrita                             |
|                                                                              |
--------------------------------------------------------------------------------
Remember that under the new security policy, we require an SSH key plus Apocrita password to authenticate. In this example we have added the private key to the SSH agent, so we are being asked only for our Apocrita password.
If the SSH agent is not running, or the key has not been added to the agent, you will be prompted first for the SSH key passphrase, and then your Apocrita password. In the following example we are also passing the required SSH options on the command line rather than using a config file:
user@pc:~$ ssh -A -i ~/.ssh/id_ed25519_apocrita abc123@login.hpc.qmul.ac.uk
Enter passphrase for key '/home/user/.ssh/id_ed25519_apocrita': <enter key passphrase>
Authenticated with partial success.
abc123@login.hpc.qmul.ac.uk's password: <enter login password>
--------------------------------------------------------------------------------
|                                                                              |
|                              Welcome to Apocrita                             |
|                                                                              |
--------------------------------------------------------------------------------
Common issues
1) "IT IS POSSIBLE THAT SOMEONE IS DOING SOMETHING NASTY!" error
WARNING: REMOTE HOST IDENTIFICATION HAS CHANGED!

@@@@@@@@@@@@@@@@@@@@@@@@@@@@@

IT IS POSSIBLE THAT SOMEONE IS DOING SOMETHING NASTY!
If you receive a login failure with this error it is because the host key of Apocrita was changed when the servers were reinstalled. Looking closer at the error message, you will find a line saying:
Offending ECDSA key in /home/username/.ssh/known_hosts:N
It means you need to delete the N-th line in your
/home/username/.ssh/known_hosts file or just delete the whole file if you
prefer (it will be created automatically on next login). For macOS users, the
known_hosts file is under /Users/username/.ssh/known_hosts.
2) "Permission denied" errors
a) "Permission denied (publickey)" error
If you have "Permission denied (publickey)", it's most likely that you did not specify the correct private key for the connection.
You can specify your private key using the following command:
ssh -i /path/to/private_key USERNAME@login.hpc.qmul.ac.uk
You can also add the private key to the SSH agent using:
ssh-add /path/to/private_key
You can list the private keys managed by the SSH agent with ssh-add -l.
b) Incorrect username
If you specifically receive:
USERNAME@login.hpc.qmul.ac.uk: Permission denied (publickey).
This is because you need to substitute USERNAME with your Apocrita username
in the commands we provide.
c) Permission denied (password) error
If you receive this error, it's likely that your private key was correct, but you are entering your Apocrita password incorrectly. Usually you are prompted three times for your password before receiving
abc123@login.hpc.qmul.ac.uk's password:
Permission denied, please try again.
abc123@login.hpc.qmul.ac.uk's password:
Permission denied, please try again.
abc123@login.hpc.qmul.ac.uk's password:
abc123@login.hpc.qmul.ac.uk: Permission denied (password).
d) "Connection refused" error
If you enter your Apocrita password incorrectly 5 times within 10 minutes, you will be automatically blocked for 30 minutes, but after this time you may attempt to connect again.
3) Windows users
If you are using the Windows-based graphical client MobaXterm, you should select your private key under the "Advanced SSH Settings" tab and enter your passphrase when prompted. Further information can be found here.
If using the standard Windows command prompt, the SSH setup is the same as the Linux/macOS examples shown above.
4) FileZilla
To use FileZilla you will need to import your private key to allow it to connect. This can be done by going to Edit and then Settings. Under this you will see a series of options on the left, you want the one labelled SFTP. This will then give you an option to Add key file. Use this to select your private key and then choose the option to convert it when FileZilla asks if you would like to do so. Once you've done this you should be able to connect. More detailed instructions are provided here.
5) I cannot authenticate on the form for uploading public keys
Please remember to use your QMUL ITS credentials to authenticate in order to use the upload form. This is the same username/password as your QMUL email account.
The small number of users without an active QMUL account will need to email us their public key file instead.
6) How can I change the password for an existing private key?
This also applies if you initially used a blank password for your private key.
You don't need to make a new key pair, instead use
ssh-keygen -pf /path/to/private_key to set or change a password on an existing
private key. Replace the path with the real location of your private key, for
example:
ssh-keygen -pf ~/.ssh/id_ed25519_apocrita
7) I tried using ssh-copy-id to copy my new key to Apocrita, but it's not working
The ssh-copy-id utility is useful for adding a public SSH key to the
authorized_keys file on a remote system. However, this is only possible if
you have an already working key pair. After you have a working key pair, you
may add and replace keys using ssh-copy-id in future.
Title image: Maxim Zhgulev on Unsplash